As we all know, we should be publishing content on our Social Media sites daily to reach our audiences effectively.
To ease this task, Postcron gives you the option of scheduling hundreds of posts simultaneously. That way, you can save time on your work.
Today, that’s exactly what we’ll be showing how to do! How to Upload Bulk Posts within minutes.
Why Should I Upload Posts in Bulk?
Before beginning the tutorial, we would like to explain why you should Upload posts in bulk with Postcron.
First of all, it’s a great way to get ahead on work, since it allows you to schedule all the posts you would normally publish daily on your social networks in the next days, weeks, even months, in just a few minutes’ time.
In addition, uploading your posts in “Bulk” will free you from the task of having to login each time you want to schedule a post.
Choosing to upload posts in bulk is the best way to schedule hundreds of posts at the same time that will automatically be shared on your social accounts on the days and times you decide.
It’s very similar to the traditional way of scheduling posts with Postcron just with the possibility of adding a bunch all at once. To start scheduling in bulk, you just have to sit at your computer for a few quick minutes and follow the steps in this tutorial.
Now, having said that, let’s get to the point!
How to use a bulk to schedule Facebook posts?
- Create a spreadsheet with all the posts that you want to share
- Login on Postcron and select the account where you what to schedule your posts
- Upload your bulk file to schedule Facebook (or any network) posts
- Postcron will publish your posts on the day and time that you specified
If you need full details, continue with the reading…
How to Schedule hundreds of posts in a few minutes using Postcron bulk uploader?
Now, we will show you how to access the section on the dashboard where you can upload posts in bulk. Then we will teach you how to create a .CSV spreadsheet, required to upload hundreds of posts in minutes, and finally, we will review the Bulk Uploader process from the dashboard step by step.
a- Identify the section where you should upload your bulk posts File
- To start, go to the Dashboard of your Postcron account.
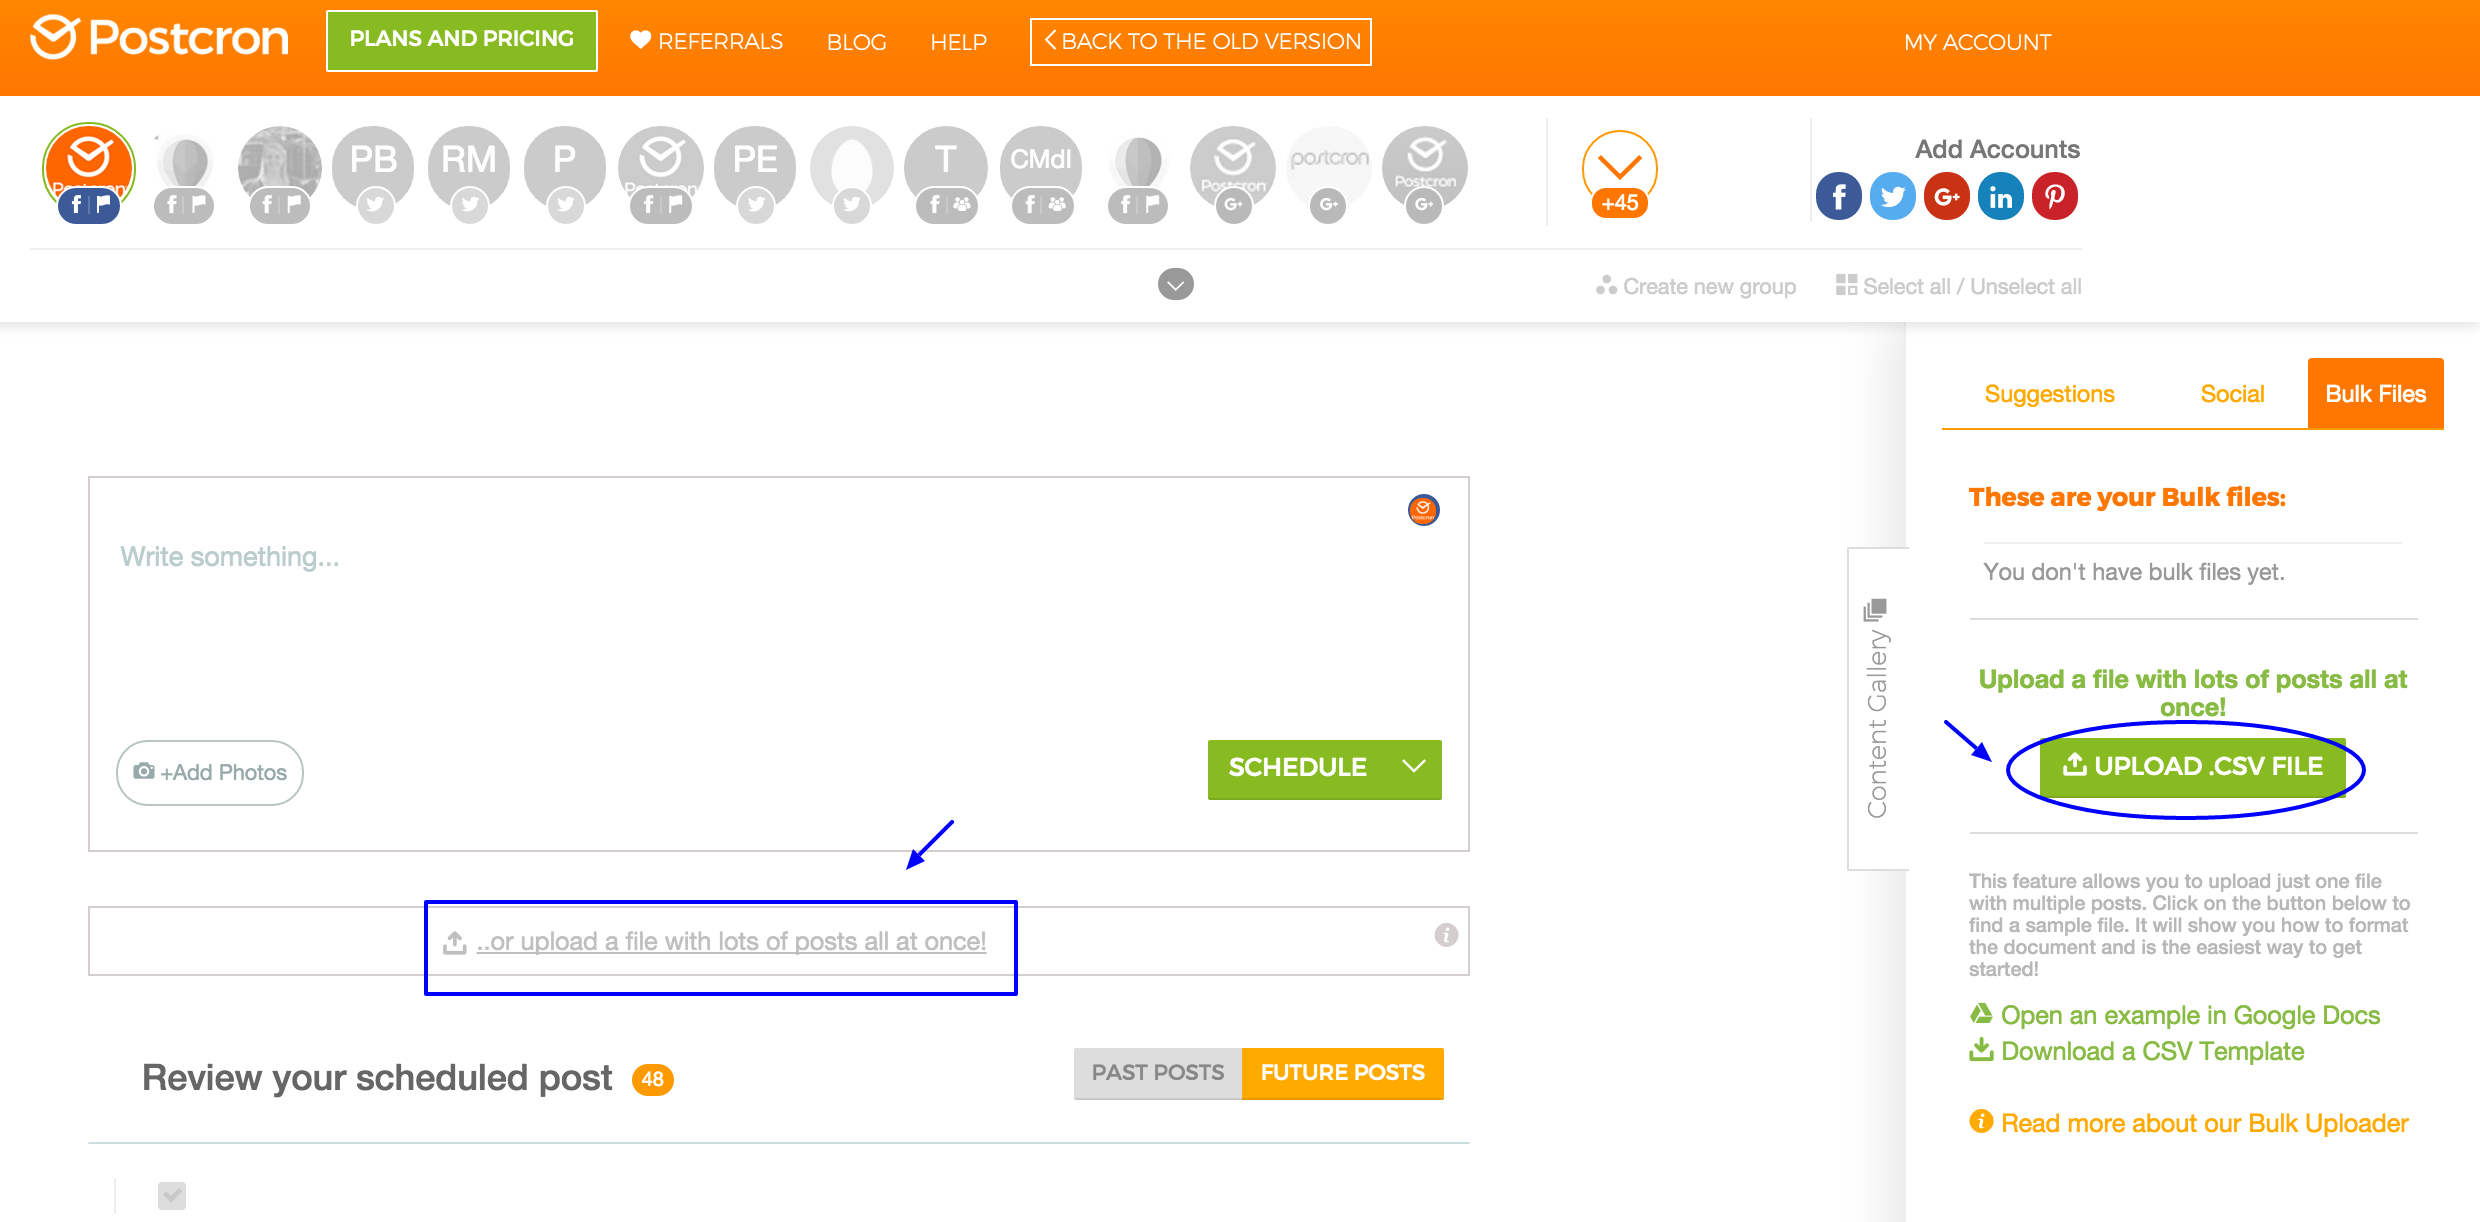
- Once there, you can choose between two different ways of getting to the “Bulk Uploader” (the tool designated for uploading posts in bulk). The first way is to click the “… Or upload a file with lots of posts at once!“, as shown in the image below.
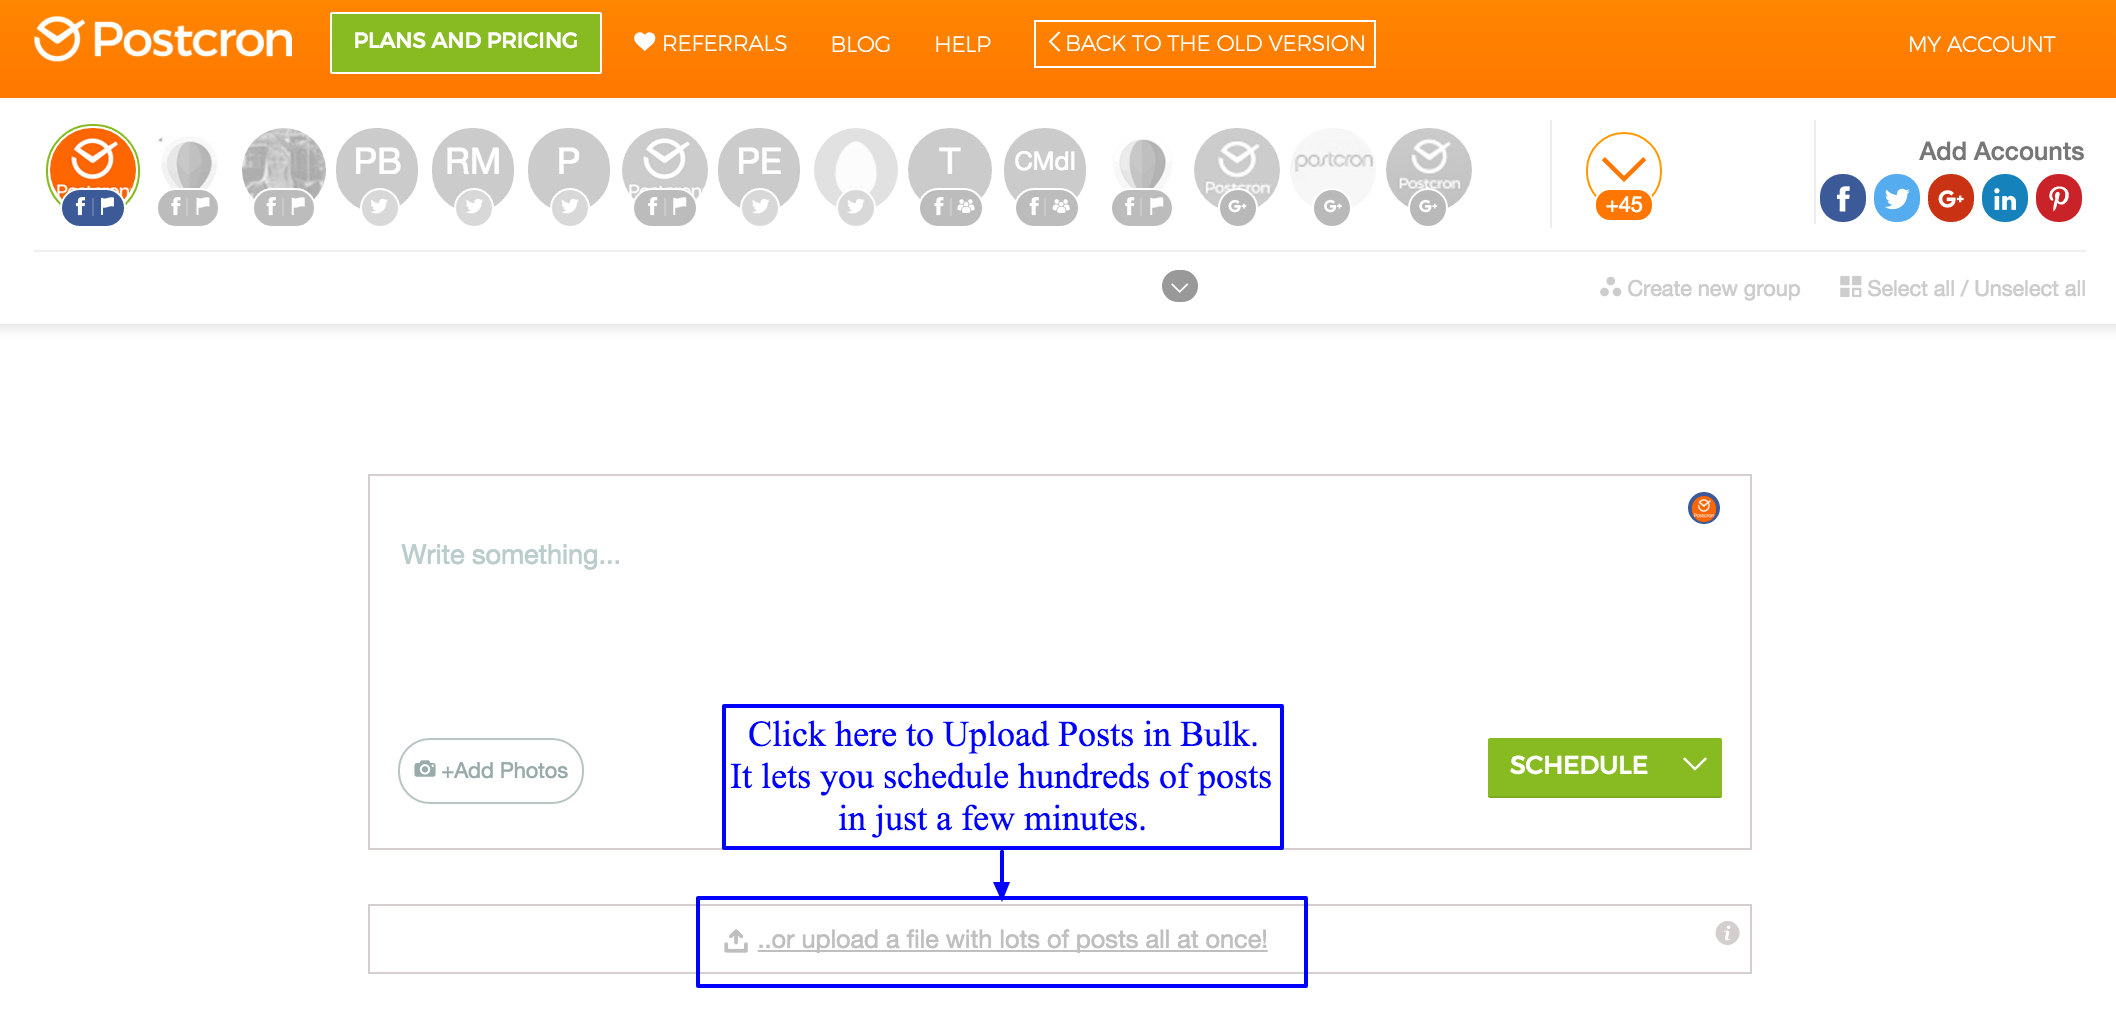
After clicking this option, a window will pop up so you can select your CSV file and schedule hundreds of posts in just minutes (later I’ll show you how to create the CSV file).
Another option, which is recommended if you are “new” to uploading posts in bulk, is to go to Postcron’s Content Gallery available on the right side of Post Editor. There, you will find a help module and examples to follow. Once in the Gallery, click the “CSV Files” tab, as shown in the animated GIF below.
3- Then click the green button that says “Upload .CSV File“. Below you have the option of viewing an online example to see the format of the file. You also have the option of downloading a sample .CSV file to your computer.
Accessing the Bulk Uploader from the Content Gallery also gives you the option of “Reading more about our Bulk Uploader“. This is a step by step guide with directions on how to create your .CSV file to Upload Posts in Bulk:
Now that you know where to go to Upload Posts in Bulk, I will show you how to create the CSV file which allows you to schedule your content much faster and easier!
b- How to create a .CSV file to Upload Posts in Bulk:
In order to Upload Posts in Bulk, you need to enter the content you want to schedule into a spreadsheet. This is the fundamental piece that will allow you to schedule all of your posts ahead of time.
You can create your spreadsheet for the Bulk Uploader with either Google SpreadSheets or Microsoft Excel. The only condition that you must comply with in all cases is that the file has to be saved under the .CSV format (if you fail to do so, the procedure will not work, so it’s important!).
Along those lines, the other key point to keep in mind so that your file works properly, it is to respect the format required by Postcron. This format requires 8 columns and is as follows:
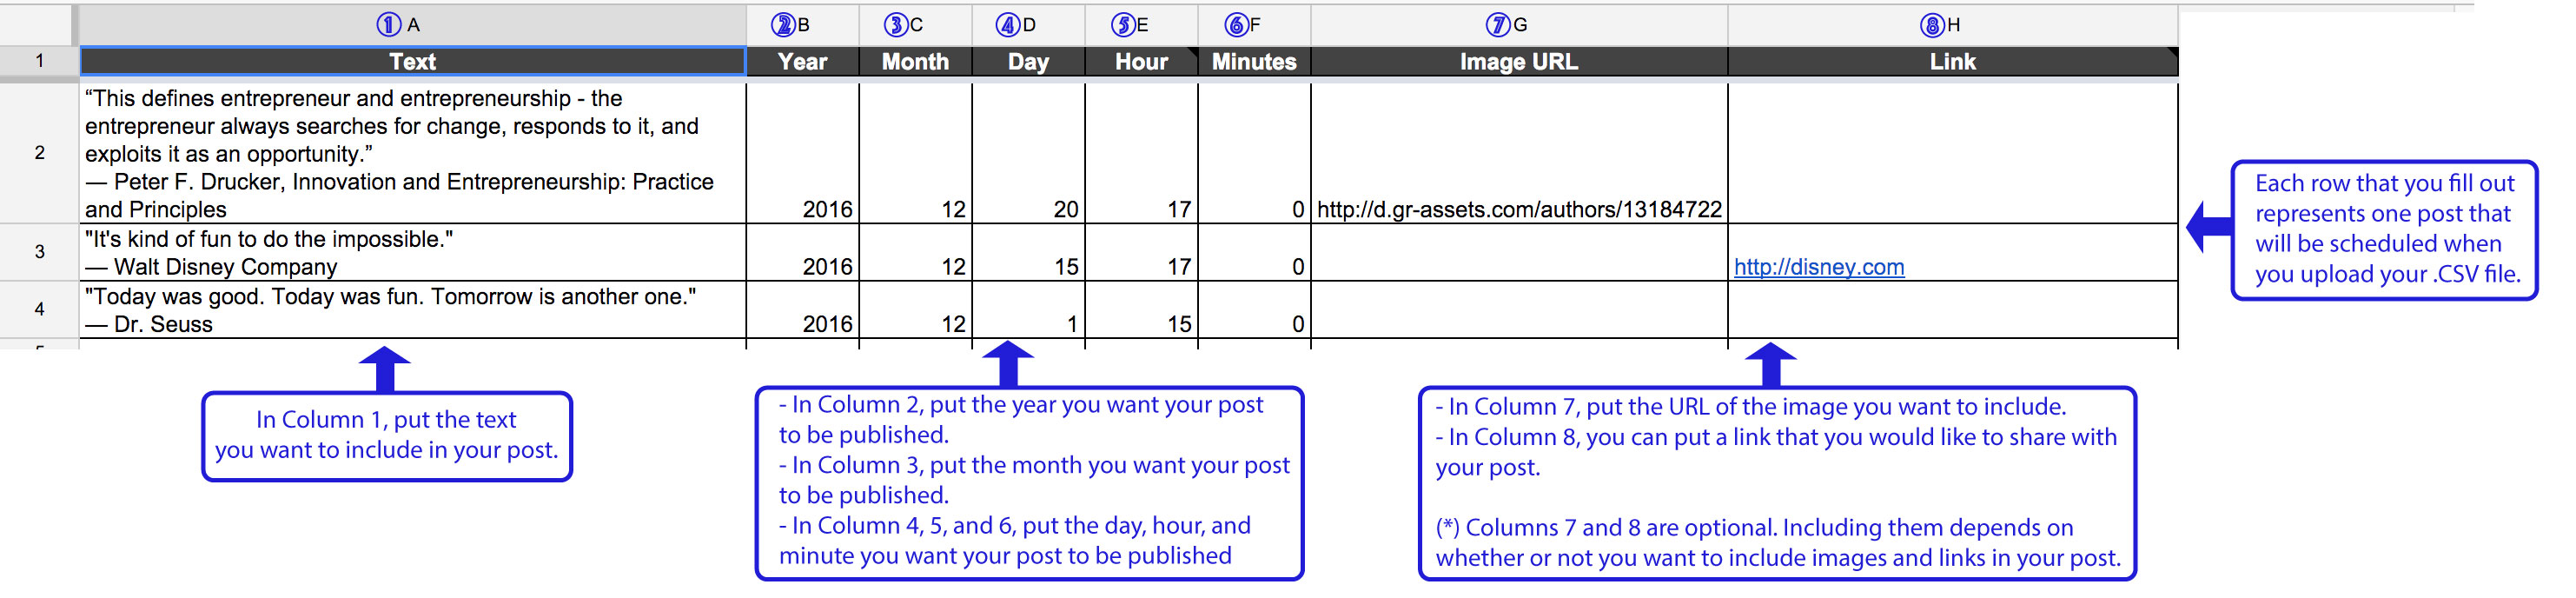
As you can see in the image above, each of the 8 columns represents a piece of data that needs to be filled in, in order to schedule your posts. On the other hand, each row represents a post that will be scheduled according to the data you enter. So, if you fill in 100 rows, you’ve scheduled 100 posts.
Let’s take a step by step look at the process of creating your spreadsheet to Upload Posts in Bulk.
1- Create a .CSV file with 8 columns in Google SpreadSheets or Microsoft Excel. Each row of the spreadsheet represents one post.
The 8 columns must contain (from left to right) the following information:
- The First column contains the message of your post (text only).
If you want to create a post just with image or link, without text, you can leave this column empty.
- The Second column contains the year you want your post to be published.
- The Third column contains the month you want your post to be published.
- The Fourth, Fifth and Sixth columns contain the day, hour, and minute you want your post to be published.
- The Seventh column contains the URL of the image you want to accompany your post.
If you want to create a post with multiple images, you can add in this column the URLs of all the photos you want to share in your post, separated by a comma.

If you want to create a post without image, you can leave this column empty.
- Finally, the Eighth column contains the URL of the link that your post will go to when users click on it.
If you want to create a post without link, you can leave this column empty.
2. When you finish creating your file with all the posts you want to schedule and the times, save it in the .CSV format.
3- Once you have saved your .CSV file to your computer, go to the Post Editor of Postcron, select the account(s) where you want your posts to be scheduled, and click on the “…Or upload a file with lots of posts all at once! “. Finally, select your CSV file and click “Open”, as shown below.
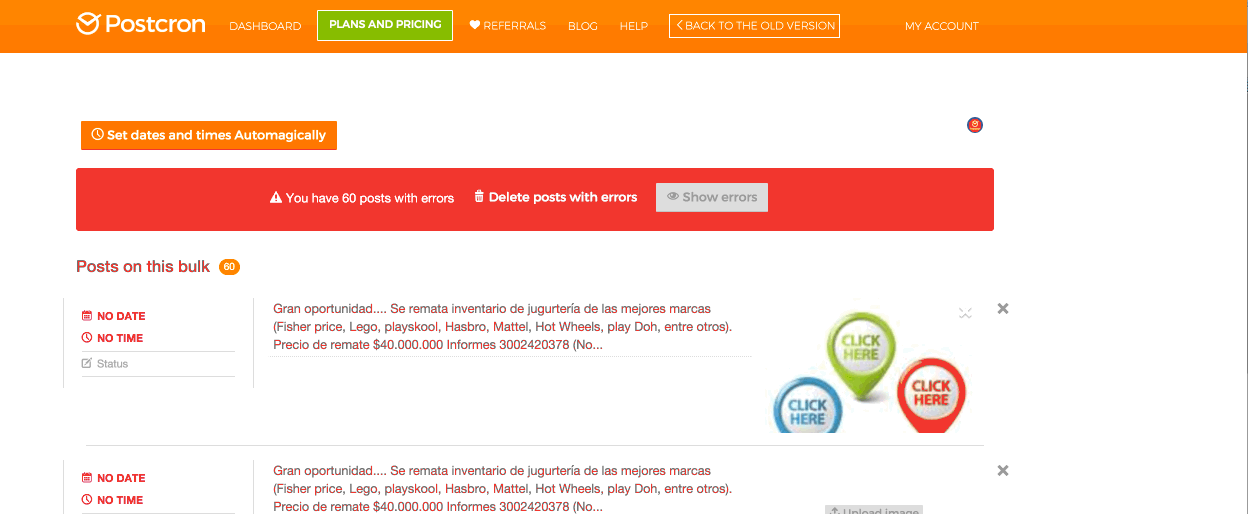
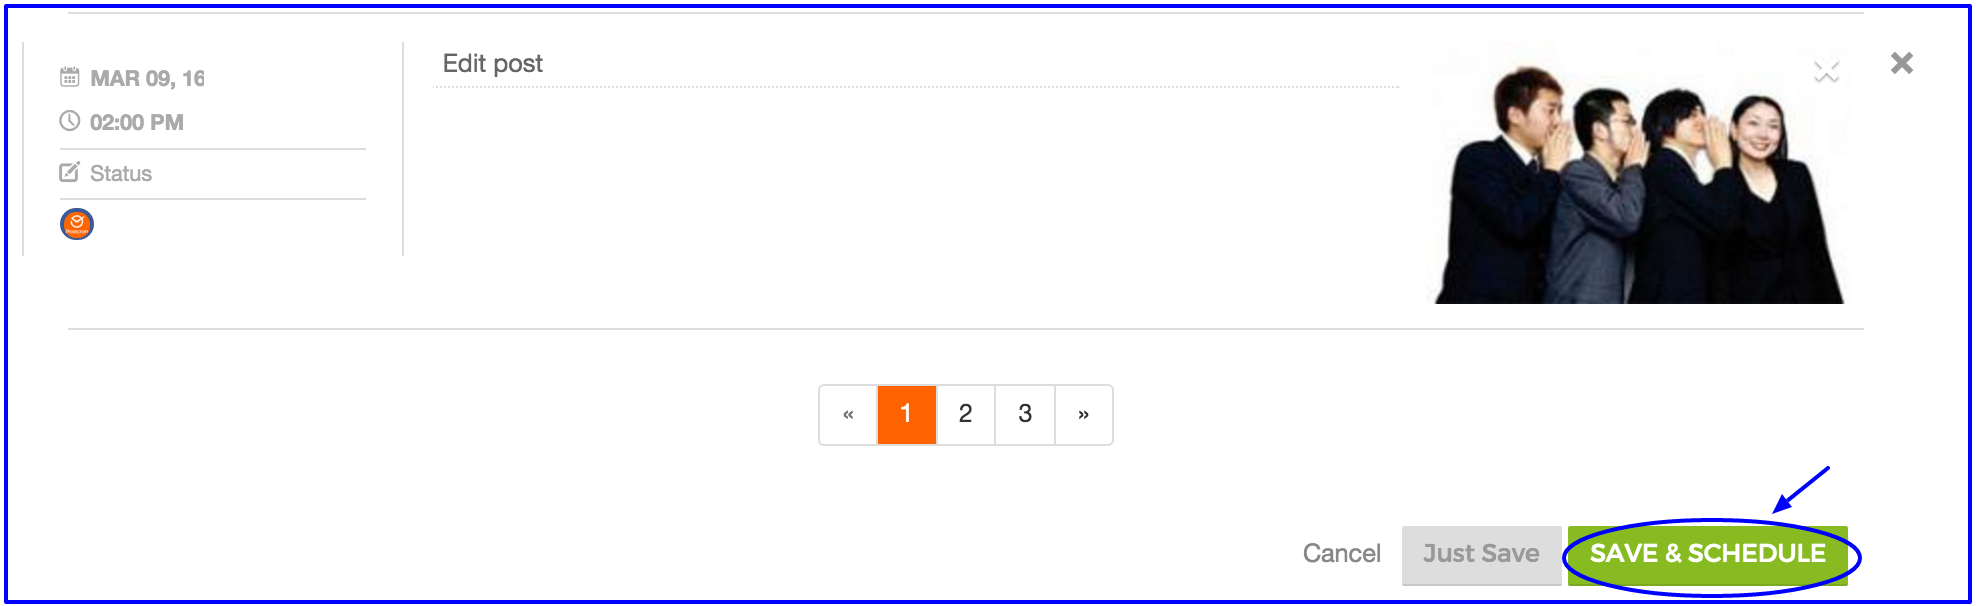
Once your posts finish loading, you can edit them directly from this same page. Practical, right?!
Finally, after uploading your .CSV file you must click the “Save and Schedule” button:
c- You can add all the days and times of your Bulk Upload in an even easier way:
Now that you know how to upload the file, you can either choose between the method we just explained, or automatically setting the times and days from Postcron. The advantage is that you can easily set up your times in a much simpler way.
So do it this way, when you’re creating your .CSV file to Upload Posts in Bulk, just leave the Year, Month, Day, Hour and Minutes fields blank, as shown below:

When you finish making your .CSV file, upload it normally from the Postcron dashboard, as explained above. Once your posts are uploaded to the platform, the system will give you an error message saying you that you need to enter the dates and times, but don’t worry! Because now you’re going to set them.
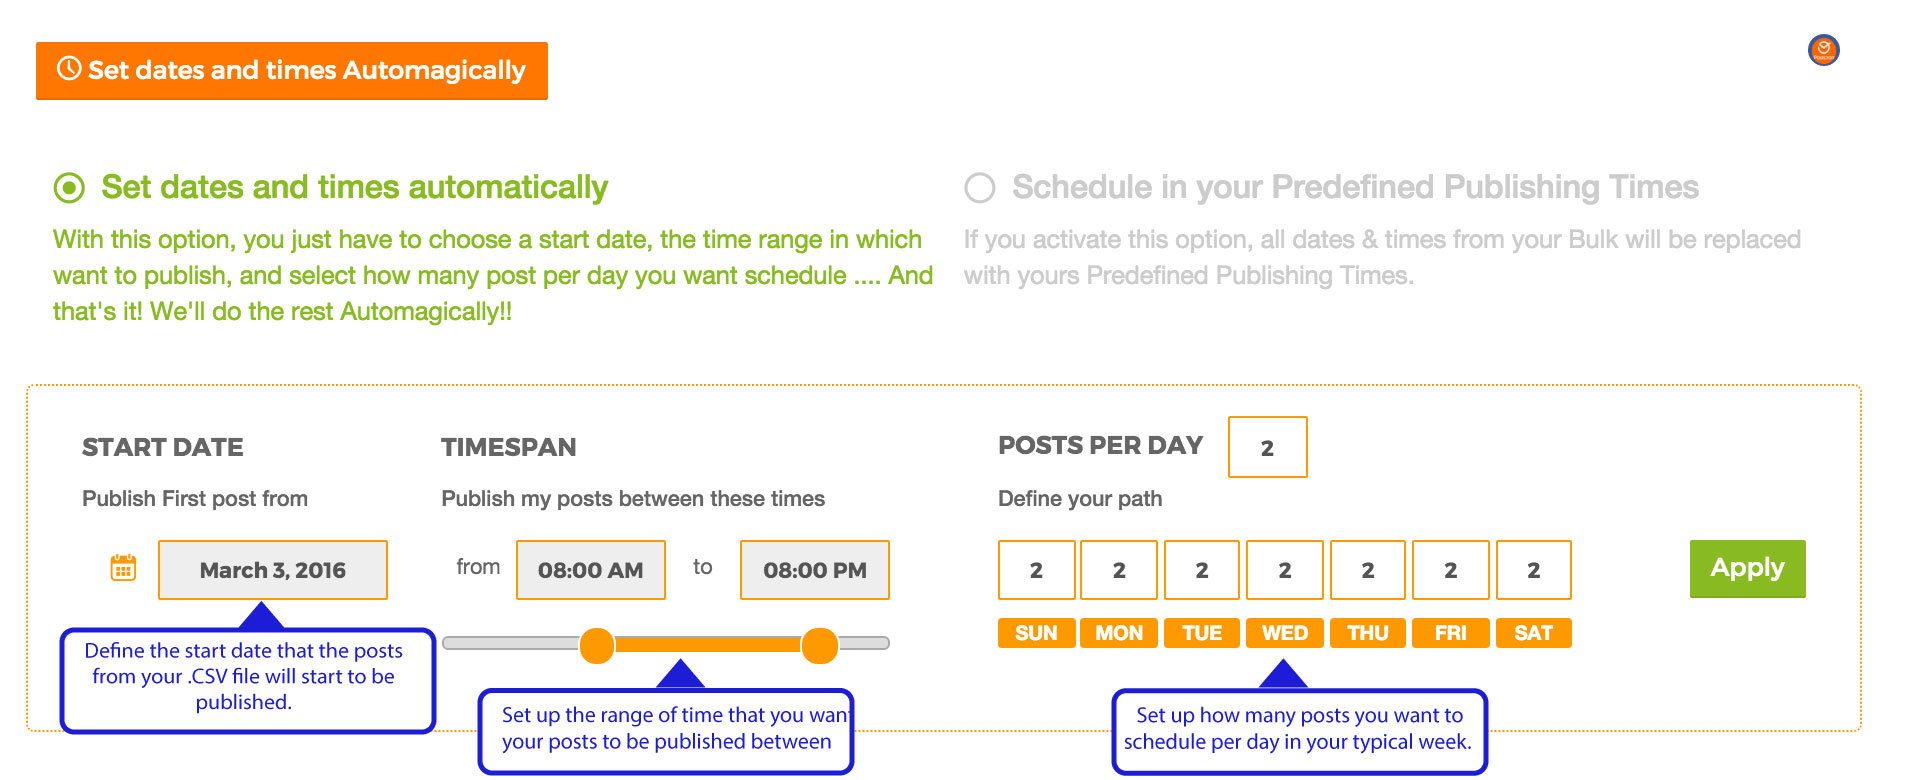
Just click on the orange button above that says “Set days and times Automagically”, as shown in the image below:

When you click on it, a window for customizing your schedule will appear.
It allows you to:
- Let Postcron apply the schedule you set automatically to all your posts. Just indicate: when you want to start posting, between which hours, and the number of posts you want per day.
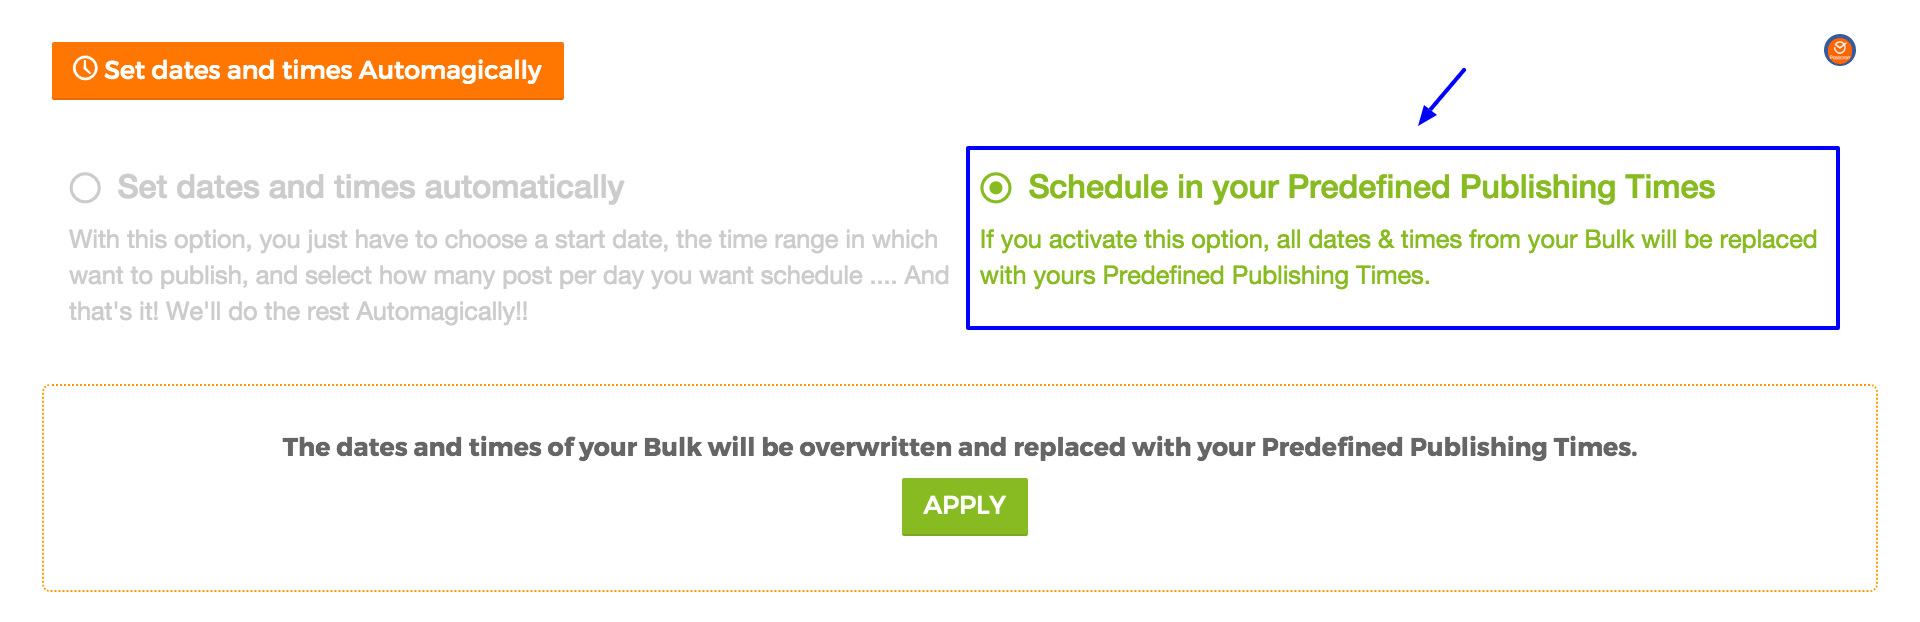
- Or, click on the “Schedule in your Predefined Publishing Times” (on the upper right) to apply them to the times you have previously set up for each social account. (To learn how to do that, read our tutorial “How to Schedule Posts using Predefined Publishing Times”
When you’ve finished customizing your schedule, click the “Apply” button. Voilà!
You can also click on this option that allows you to automatically schedule all the posts in your predefined publishing times
EXTRA TIPS!
- Once you have saved your .CSV file in Postcron and assigned it a name, you can always access it again from the Content Gallery to reuse it again later within the same account or with another.
- It basically means that Postcron will save every .CSV file you upload, so that the next time you want to use it, all you have to do is:
- 1- Select the account(s) where you want to schedule your posts
- 2- Open the Content Gallery and go to the .CSV Files tab
- 3- Select the file you want to reuse
- 4- Postcron will open the file to allow you set up the new schedules (using either of the ways mentioned above – that is, daily parameters or predefined publishing times)
- 5- Schedule your posts, and voila!
Super Simple!
You can control your posts and edit them individually by going to the section “Review your Scheduled Posts“:

That’s it! If you followed the steps carefully, you should have been able to schedule lots of posts all at once! If not, write us under the Help Support option.
Still you feel a little lost? I invite you to watch this tutorial video about the CSV and some tips:
I hope this tutorial has been useful to learn how to Upload Posts in Bulk!
Did you already know about this Postcron feature? Did you find it easy to use?
We want to hear your opinion! And please remember to share this post with any of your contacts that you think it might be useful for. Until next time! 🙂